
ZR1: The Ultimate Corvette
ZR1 is the fastest, most powerful car Chevrolet has ever produced, and rivals the world’s best luxury sports vehicles both on and off the track, and was the overall winner of the 2010 Car and Driver Lightning Lap competition, which pitted the ZR1 against the fastest cars in the world. And because it’s Corvette, it’s the only truly American sports car in the competitive class. -chevrolet.com
Box Contents

Revell's 2010 ZR1 is based off a mold dating back to 2005 and is the latest installment in the firms series of sixth generation Corvettes. The kit contains 103 pieces (69 white, 4 vinyl, 1 transparent red, 11 chrome, 8 metal, and 10 clear) and is for all intents and purposes a 2006 ZO6 kit with a new parts added to reflect the body and wheel changes along with a supercharger assembly for the engine and a fairly standard instruction and decal sheet for a Revell C6. All of the parts are well molded and are fairly free of defects such as mold lines and flash. Props to Revell for ink stamping their brand marker on the chassis these days rather than the horrid raised letters of the old days. The clear and chrome trees are separately bagged to prevent scratching on their delicate surfaces.

Decals

The decal sheet is pretty much the same sheet dating back to the original C6 coupe of 2005 with the addition of gray accents for the interior but oddly no composite fiber template for the roof. Bear in mind there are two versions of this kit, the U.S. version seen here and a German version. The German does come with carbon fiber decals for the roof, however they are the wrong pattern so either way to properly model a ZR1 you will need a sheet of twill weave carbon fiber from an aftermarket source such as Scale Motorsport.
Instructions


Instruction steps 1 & 2 comprise the engine and basic suspension. The main engine block is the same as Revell's other C6 kits with a new four piece supercharger assembly for the ZR1 package. The four disc brakes are extremely nice with molded speed holes and tiny engraved "Corvette" lettering on the calipers. Optionally you can use a #78 bit in a pin vice to further detail the brakes by drilling the speed holes all the way through as well as removing the engraved letters and replacing them with the provided decals if your hands aren't steady enough to paint them.
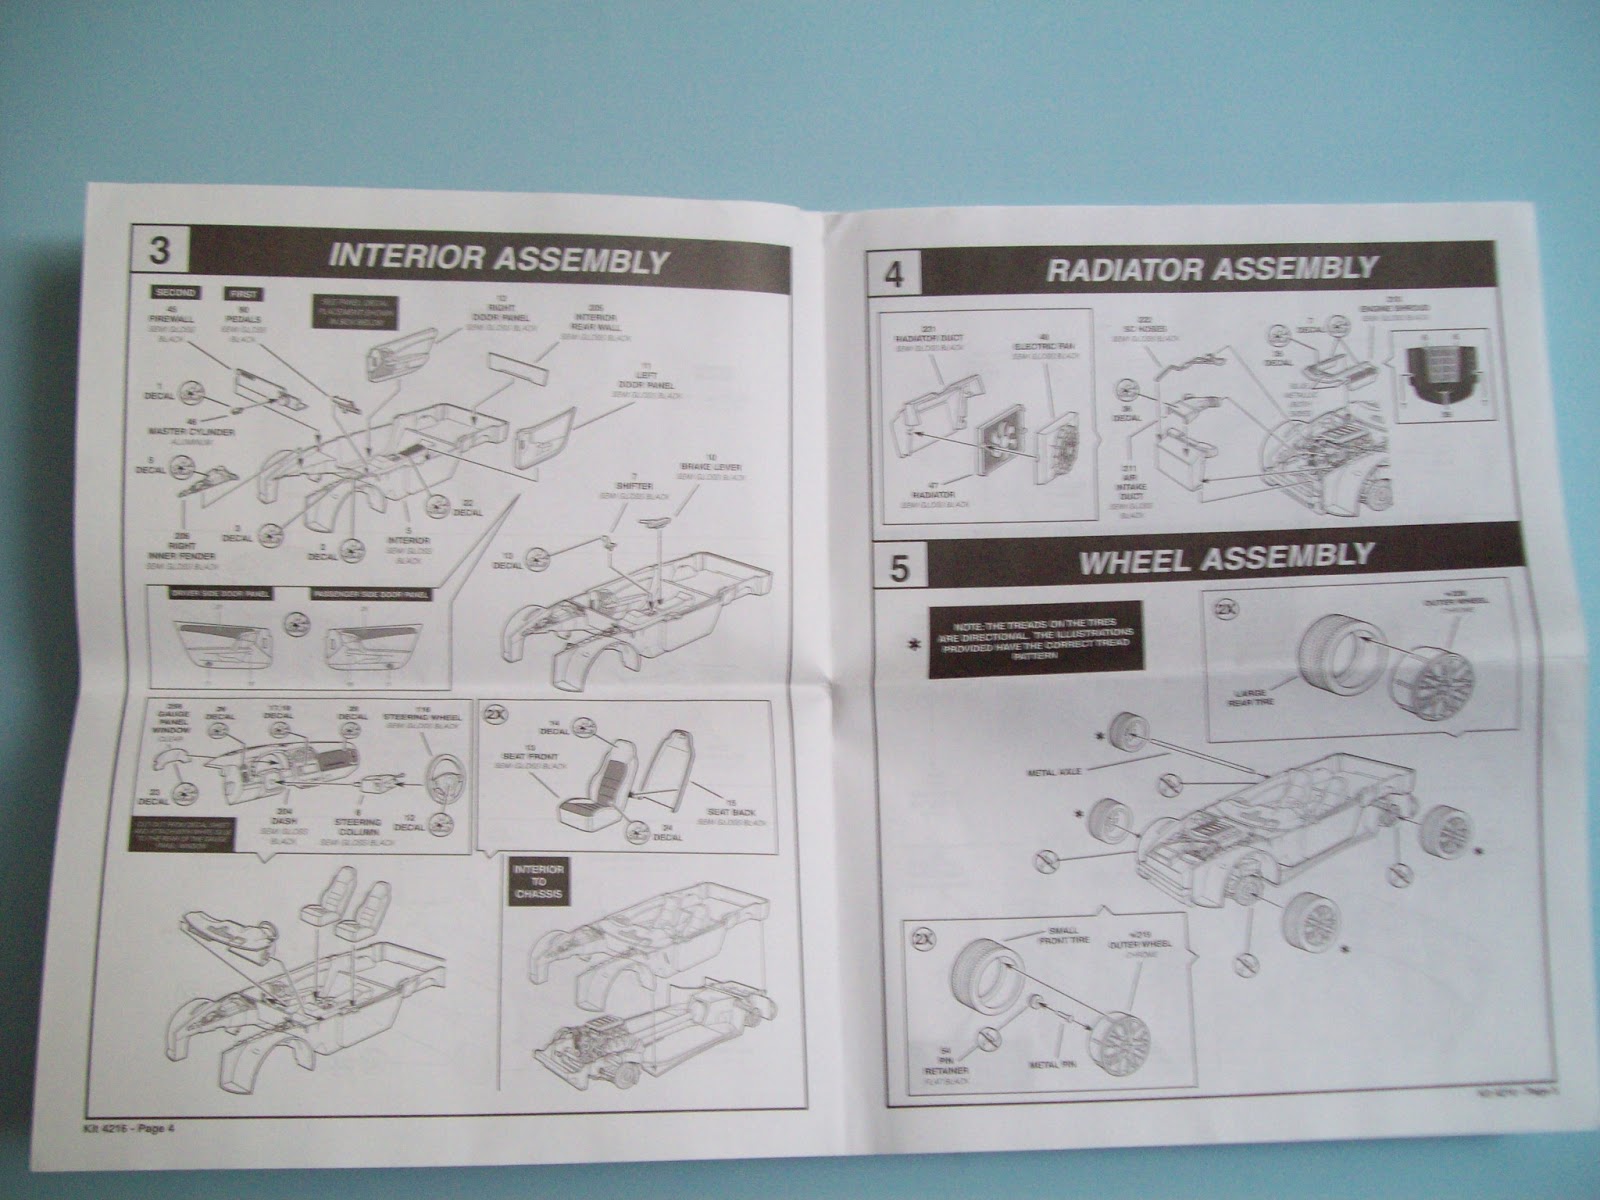
The interior assembly in step 3 is identical in all ways to previous sixth generation Corvettes. The instrument panel is represented by a decal that slips behind a clear part, something Revell has been doing since their C5 kits of 1997-2004 and it leads to a very nice effect. The gray accents on the door panels, seats, and glove box are represented on the decal sheet, however personally I'm leery of this. Decals often have a tendency to not conform to compound curves therefore I would recommend masking and painting the accents instead. Step 4 details the radiator and engine bay. A new piece is included for the supercharger top which is visible through a small window in the hood and with careful painting will look very nice with it's anodized blue accents and included lettering decals. Pay careful attention to the instructions in step 5 which deal with the wheels. The wider tires go on the rear while the narrow ones go on the front. Additionally the treads are uni-directional so you will need to ensure they are oriented correctly while you are installing them. The wheels themselves are chrome plated, however the full scale version comes with a brushed aluminum or gunmetal finish. You can either tone them down with a coat of flat clear or strip the chrome entirely and repaint them with a dull metallic paint.

Steps 6-8 comprise final assembly. Watch the hood hinges in step 7 as it's been my experience with previous C6 Corvettes that they can be somewhat tricky to line up and make sure the glue is thoroughly dry before slipping the body over the chassis. I need to refer to my references but I'm fairly sure that even though the instructions state to paint the underside of the hood black it should actually be twill weave carbon fiber decal just like the roof. Step 6 has you install the window glass before mating the body to the chassis but I would hold off on this until after to prevent the glass from coming loose when you spread the body over the interior.

The final page of the sheet is decal application. The black areas on the roof should be carbon fiber as I referenced earlier in the post, so make plans for this prior to painting. The instructions state the body should be painted "gloss red" but the full size 2010 ZR1 is also available in Arctic White, Velocity Yellow, Black, Blade Silver Metallic, Crystal Red Metallic, Cyber Gray Metallic, Jetstream Blue Metallic, and Torch Red. Approximate color chips can be found here
Verdict
Revell's 2010 Corvette ZR1 is a great replica of this beast of a car and will sit well amongst other Corvettes or side by side with Revell's Dodge Viper ACR. This kit comes highly recommended for any performance car enthusiast.
No comments:
Post a Comment